Showing posts with label knitting. Show all posts

Saturday, July 20, 2024

Knitted baby hats

 Elsewhere on this blog I have shown some of the items I have knitted over the years. They are toys, primarily, although I'm still pleased about the Nativity set, which comes out each December. The last toys I knitted were a couple of dolls, complete with clothing, for my grandchildren. 

That was a long and quite complex project, and afterwards I decided to take a break from knitting toys. Our local friends' offspring had plenty of soft toys, and were growing too old to want new ones. Our grandchildren also had a large number of soft toys. I still wanted to knit regularly - it's supposed to be beneficial to both physical and emotional health. But I prefer projects that can be completed in just a few days, rather than many weeks.

I had previously knitted bonding squares and blankets for premature babies, for an organisation in the UK. But it had become increasingly difficult to get them to their destination, and the requirements were quite rigid. Only pastel colours, precise sizes that varied from hospital to hospital. And then they said that they didn't want anything from households with cats. I had been careful to keep the knitting away from our cats, of course. But that meant I could no longer knit for this group. I tried to find out if hospitals in Cyprus needed bonding squares or blankets, but it appeared that they already had plenty. 

In the meantime, however, a friend had started working with mothers and babies of refugees and asylum seekers in Cyprus. They always wanted blankets, but much bigger than the ones needed for premature babies. I did knit a couple, but blankets of 80-90cm squared take quite a while to finish. I made some bonding squares, and a few were used, but they're quick to knit, so no more were needed. And during the pandemic, they weren't allowed to use them.

So, as it was getting a bit cooler (this was December 2021) I then wondered if beanie hats would be useful - and was told, 'Yes please!'

baby hat (knitted beanie) for refugees

I had a couple of patterns for baby hats from the premature baby group, but of course they're intended for very small babies. So I increased both the needle size and the number of stitches, and tried a prototype using double knitting yarn. It was received gratefully by a young mother of a newborn baby, and, I was told, it was exactly the right size. 

It's a simple pattern: 64 stitches, then six rows of ribbing, followed by 30 rows of stocking stitch, and a few rows of decreasing before pulling up the remaining stitches to form the top, and then sewing up the seam.  It usually takes me 3-4 days to complete a hat, depending on how much time I spend knitting. The weight of a completed hat varies between 16g and 20g depending on the yarn used (even though it's always double knitting). So I make sure I have 15g of the main colour, and 6g of the contrast.

baby hats (knitted beanies)One of the things I don't like about knitting is counting rows. So I decided from the start to make my hats striped. That made them more interesting, too, as I selected colours that I liked together, and also meant I could use up some fairly small balls of yarn that were left over from other projects. 

Here are a few examples of the first hats I produced. I couldn't decide, at first, if I preferred the thinner stripes with two rows of each colour,  or the wider ones with four rows of each colour. 

One of the things I appreciated was that the mothers - many of them from African countries - like bright colours, so I'm no longer limited to pastels. I don't use yarn that's specifically intended for babies, as it's not going next to their bodies, but over hair. 

At first I kept track, but it wasn't long before I lost count. Of course knitted beanie hats aren't needed in the summer in Cyprus, but I tried to make sufficient that each new baby could be given one in the cooler months. 

Then early in 2023, one of the women who works for the refugee/asylum seeker group asked if I could also knit some  bigger hats for older babies and young toddlers. I was delighted to be asked, and quickly realised that I should make them in slightly different styles so it was immediately obvious which size they were intended for. 

older baby hats
For older babies - typically six months to a year - I cast on 72 stitches, and knit 8 rows of rib (k1 p1), then I knit six stocking stitch rows with the main colour, followed by two of a contrast. I repeat this four times, then a couple of extra rows with the main colour, so there are 34 rows of straight stocking stitch. A finished hat of this kind typically weighs between 22g and 25g, so I ensure I have at least 22g of the main colour, and 6g of the contrast.  Of course it would be possible to use up very small scraps (2g each) by having the contrasting stripes in different colours.

That's then followed by the decreasing and finishing steps. 

The decreasing rows, for both these and the newborn baby hats, are: 
First row - k2, k2tog, repeat to the end of the row.
Second row - purl
Third row - k2 k2tog, repeat to end
Four row - purl
Fifth row - k2tog to end
Sixth row - purl

finishing knitting baby hat
That leaves 16 stitches for the newborn hats, 18 stitches for the bigger ones. I cut off the yarn, leaving a longish strand, and thread it into a darning needle then pull it through the stitches and pull tight.  

Then, with the hat inside out, I sew up the seam, using both that thread and the one left at the bottom from casting on. Of course I make sure all threads are firmly finished and threaded through stitches so the hats won't come apart. 

It should be obvious from the way the decreasing works that the initial number of stitches must be divisible by four. The 'preemie' hat pattern on which I based mine had 60 stitches and smaller needles. I use size 4mm (8 in the old-style UK measurement, and apparently 6 in US sizes). But anyone wanting to try these probably needs to experiment, depending on the size of the baby or babies you're knitting for, and your tension. 

knitted beanie hats for young toddlers
As for hats for toddlers (around age 1-2 years), after researching average head circumference I decided to try starting with 80 stitches, and making wider stripes. I use k2 p2 rib for the bottom, and do eight rows. Then a total of 38 straight rows of stocking stitch in stripes of 8 rows (and an extra six in the main colour at the end). For the decreasing rows I start with an extra one: k3 k2tog, repeated to the end (followed by an extra purl row, of course). 

These hats weigh between 31g and 35g, so I ensure I have around 28g for the main colour, and 15g for the stripes. 

I have friends who knit beautiful and complex shawls, blankets and other projects, and I have immense admiration for them. But I don't have the patience for those, which require a lot of row- and stitch-counting, and a fair bit of repetition. I have been making baby hats for two-and-a-half years now and there's enough variety in the styles and colour choices that I don't find it boring. And it's satisfying to know that they're being used, at least in the cooler months. 

Monday, July 29, 2019

Knitted Dolls (Jean Greenhowe)

This project has been a long time in its gestation. I have had Jean Greenhow's book 'Knitted Toys' for many years, and wanted to try something a tad more ambitious than the smaller toys I had previously knitted. At the suggestion of some small friends, I decided to try her knitted dolls.  I don't think I had realised quite how big they would be, despite the instructions stating that they are each 47cm.

These dolls are different from most of the knitted toys in this (or other) books, as they have removable clothes. I didn't know who I was making them for at first. I wasn't sure I would even finish them; I was more interested in making the clothes than the dolls, as they seemed more interesting.

It's over two years since I started with this, the 'boy' doll.  I never like knitting dolls with pink faces and hands; the pinks available never seem like flesh colours. So I prefer to use light browns, to give a suggestion of Asia or South America, or perhaps just a slight tan.

I had an idea of making him for my grandson, who was three at the time.  But as the project proved so much more complicated than I expected that it got put off, and put off...

I finally finished him yesterday.

Around the same time, I also started a 'girl' doll, in a slightly different shade of brown. Perhaps I should have completely finished the 'boy' doll by this stage, but I had a granddaughter too, and decided they should have one each, at the same time.

But she was only six months old, so I knew it would have to wait at least a year.  And then when my grandson's fourth birthday rolled around, they were travelling, and I decided to leave it another year.

He is now five, and she is two-and-a-half.  She's old enough for dolls who can be dressed and undressed, and he is still young enough to appreciate this kind of thing.

Since each doll can wear the clothes of the other, they can switch around if they want to. And if there's any enthusiasm, I can even knit more clothes to be added to the few I have already done.

My favourite part of the project was the easiest: the hats, scarves and mittens.  So here is the boy dolls, dressed up (and sitting up) wearing his winter woollies.

Under the yellow jacket, he's wearing dungarees that slip on.  The jacket was supposed to have buttons and button holes, but I didn't want to use anything so complicated.  So I just used a popper (snap fastener) at the top. 

The hat is in three coloured stripes, and the scarf a very simple one.  The original had tassels, and the jackets had pictures on the back, but I wanted to keep it all as straightforward as I could.


The girl doll has a grey jacket, which goes with all her other pink and purple clothes.  Her hat is in two coloured stripes and the scarf, again, is a very simple one. Just long enough to go around her neck.

I put her in her purple dress for this, rather than the pink jumpsuit (or pyjamas, perhaps?) which she's wearing in the other picture.  This shows more of how the doll is knitted, with cream coloured socks (blue for the boy) and black shoes all knitted as part of the actual doll. 

They both have a kind of onesie undergarment too, which then doubles as an undershirt when they are wearing something like dungarees, or indeed the dress. 

Here, to show how it works, is the girl doll in just the purple dress.  Underneath is the creamy undergarment, which has little cuffs and a collar to make it look like a shirt or blouse under the dress.

The original dress in the book had contrasting knitted flowers around the skirt. But they seemed over-complicated to me (and rather fussy, too).  They also seemed like the kind of thing that could break off too easily. 

The dress was supposed to have buttons at the back, too, but, again, I used just a popper.  I had some trouble sewing the dress after knitting, as I hadn't quite grasped how it works. The instructions for putting the pieces together in this rather dated book are not as clear as those in more recent books and booklets.

This shows the pink jumpsuit which the girl doll is wearing in the first picture, and also the pinafore dress, with little straps which, again, show the creamy vest/shirt underneath. 

The pinafore dress easily slipped off and on, so I didn't bother with the buttons that were recommended to fasten the straps. And for the jumpsuit, I used a thin strip of velcro to fasten the front.  I couldn't find very thin velcro, so I cut a regular piece in half vertically, and sewed it just inside. It can just about be seen in the first photo.

These are the boy doll's other clothes.  A pair of trousers, which are elasticated around the waist, and a kind of jacket without sleeves.  I didn't particularly like this jacket; it was surprisingly tricky to sew together, and it was hard to get it to stay flat.

However, I think it goes quite well with the trousers.  I used velcro at the front of this sleeveless jacket, too. I quite like the idea of the clothes as low-key educational garments: some elasticated, some velcro, some with poppers. 

The hardest parts of making the dolls, for me, were the faces and hair.  The originals - shown at the side here - were supposed to have felt eyes glued in place, but I couldn't see those lasting very long in the hands of young children.  So I used Jean Greenhowe's popular method of making eyes with knots made out of double yarn, winding around three times.

I made eyebrows, too, which weren't in the originals, and those improved the appearance.  The hair instructions were very confusing and I ended up improvising somewhat, but I quite like the results and hope my grandchildren will be happy with them too.

Wednesday, July 18, 2018

Bonding Squares for premature babies

As I wrote in my last post, about knitting blankets for premature babies, there is quite a demand in UK hospitals for blankets, tiny baby clothes, and also bonding squares. I had not heard of bonding squares until I started reading about knitting for premature babies. I joined a useful Facebook group, and they provide both instructions and some explanations.

Bonding squares are knitted in identical pairs, usually square in shape, around 10-12.5cm square (that's four or five inches). They are used when, for any reason, a mother must be separated from her baby. This happens most often when a baby is premature. There is evidence for the vital importance of 'bonding' in the earliest hours after a baby's birth, when he or she gets to know the mother's scent. This works both ways; the baby's scent is an important part of the trigger for the mother to produce milk.

Normally mother and baby would spend a lot of time cuddling, including some skin-to-skin contact, and the bonding by scent happens naturally. But a tiny or sick baby may have to be in a special incubator, and this is where bonding squares come in. One is given to the mother, and the other to the baby. The baby will have it to lie the head on, and the mother will also keep hers close. Every four to six hours, they are switched, so each becomes familiar with the other's scent.

Bonding squares don't take long and can be made in any pattern so long as there are no holes. A beginner knitter could simply knit without any purl or other pattern to produce suitable squares. They can also be crocheted.
The number of stitches needed depends on the size of needles, and the pattern used. I have learned from experience that on 4mm needles, using double knitting yarn, I need between 24 and 30 stitches for around 12.5cm, and I have to knit about 36-40 rows. Some patterns require multiples of three, or eight, sometimes with one or two extras - so it's impossible to give an exact number.

I had tried knitting some earlier in the year, but they were too big so, as explained in the previous post, I sewed them together to form a blanket. However, on returning to Cyprus, I learned from a friend that babies are more often separated from their mothers routinely. She was visiting someone whose baby was being kept away from her, so I quickly knitted some bonding squares, in the hope that they might help.


After that, I knitted a pair or two each week for about three months until the weather became too warm for much knitting. I had to keep the cats well away, of course; babies cannot have any allergens nearby. I wasn't sure if local babies would need more, but knew I could send some to UK hospitals next time I'm there.

I decided to experiment with as many different patterns as I could find. The Facebook group has several suggestions, and I found one or two others elsewhere, and adapted a few myself.  Since my first pair was blue, I thought I would do a pink set in basket weave stitch, which is one of my favourite styles. It doesn't need a border, and the effect is quite pretty:


I then started a pair in ordinary rib, wondering how that would work. They don't take much wool, but unfortunately, half way through the first one, I realised I would not have sufficient yarn for the pair. So I decided to do a two-toned effect:


It was the turn of pink again - while I am not a fan of matching colours to genders of babies, a lot of people liked to do so. I did this pair in double moss stitch, a stitch I find very easy to do in company (unlikes some of the more complex ones!).


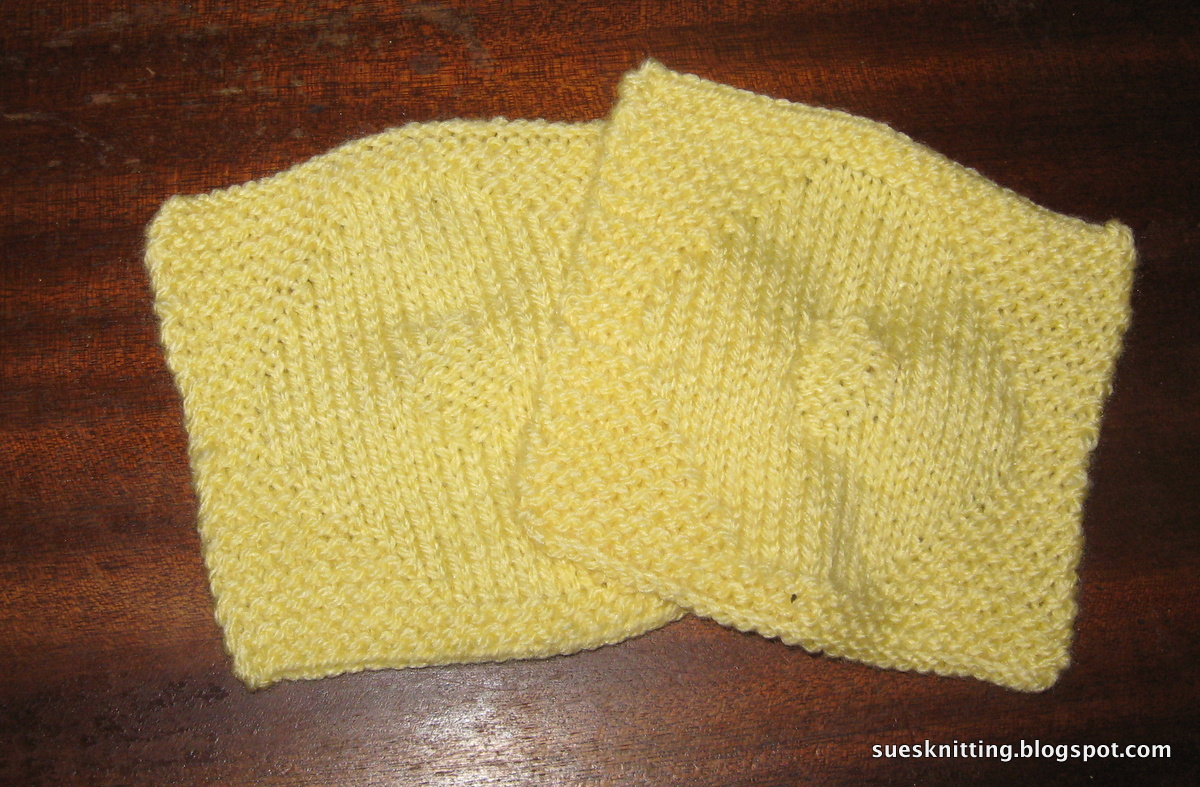
I still had plenty of the dark pink, and decided to try a pattern with a raised heart in the middle, which I found on the Ravelry site. It didn't come out square, although I knitted some extra rows once I'd realised it was wider than the height. And as a plain knitted border was needed to stop the stocking stitch part curling, it wasn't entirely even. Perhaps that's my knitting tension at fault. Still, the effect was rather nice:


I decided to adapt this pattern a bit to make a diamond shape around the edge and in the middle; the outside part was quite effective, although again it wasn't particularly even, but the middle bit didn't work too well. I don't suppose a newborn baby would mind, but I decided not to repeat this idea.


My next effort was a diagonal moss stitch pattern which I found on the Facebook group. I quite liked this, although it was hard to keep track of where I was and I had to back-track a few times:


I then tried the leaf stitch pattern, which was even more complicated - not one I could have done with anyone else in the room!  I liked it, but thought it perhaps a bit over-fussy.


Back to a simple moss stitch for my next pair:


Then I thought I would do the diamond effect style, another pattern from the Facebook group. I realised it would curl so I made a border, and was pleased that it turned out reasonably even:


Caterpillar stitch was the next one I tried - another one that was tricky to keep track of.  Again, it needed a plain knitted border. This picture doesn't really show the detail:


This is what it was like close up:


Next I followed another pattern, a simpler 'waffle stitch' which I had tried before with a blanket.


I didn't take photos of all of them, but those were the main different patterns I tried out. I think I'll be sticking to double moss, waffle stitch and basket weave for most of my future bonding squares.

We're soon flying to the UK, so I gathered up all I had done - thirteen in all, in addition to the blue ones which I had already given away.


Three of them had turned out slightly larger than the 5 inches/12.5 cm required by UK hospitals, so I kept those for my friend in Cyprus who visits newborn babies, and will be sending the other ten sets to the relevant contact on the Facebook group. 

Friday, April 13, 2018

Blankets for premature babies

I was looking for a new knitting project for this year, after spending much of 2016 on the knitted nativity characters, and 2017 knitting toys for my grandchildren and some young friends. Early in January I discovered this page about knitting for premature babies in the UK. The page listed several different sizes of blankets that various hospitals require, as well as some other smaller items.

A similar project in Cyprus (where I live) had closed, but I knew we would be visiting my son in the south-east of the UK in April, so I set to work with enthusiasm, using one of the patterns given on the site, and some purple yarn I had bought somewhat randomly from the local thrift store.

I intended to make an 18x18 inch blanket (yes, all dimensions are given in inches) but despite making an attempt to check my tension, I realised after about twenty rows that this particular pattern - which was the one called 'waffle stitch' in the knitting info pack - knitted fairly tightly, so my width was nearer 16 inches than 18.

I sent a private message to the group, wondering if I should start over, and they assured me that exact sizes don't matter too much.  And then, as I continued knitting, and was able to measure more accurately, I realised that it was in fact nearer 14 inches wide. So I kept knitting until it reached 14 inches in length, and by early February it was finished:


Fired with enthusiasm, I decided to attempt the more complicated looking 'basket-weave' pattern, using some rust brown yarn; I had realised by then that this size of blanket took between 50g and 100g wool, and I had about one and three-quarters balls of this colour.

This time I was more careful with the tension, and used 4.5mm rather than 4mm needles. The resultant blanket, which I finished a couple of weeks later, was close to 18 inches square.


I wanted to use more of my yarn stash before buying more, so as I didn't have any that was more than 50g, I choose two colours which I thought went well together, and decided to knit the pattern called 'double andalusian' in stripes.

Although all my wool is classed as Double Knitting, this one was apparently a bit thicker than the previous one, and the same number of stitches measured - after several rows - 20 inches. No problem, I thought, that's one of the sizes required.

However as that's somewhat larger than my previous attempts, I ran out of the darker blue (which had not been a complete ball) at around 15 inches in length. I had thought both balls were 'Stylecraft', bought in the UK, but after searching online in the hope of ordering some more, I could not find the colour. So I made a trip to our local small, friendly yarn shop, and found, to my relief, the exact same shade.

However, at 18 inches I ran out of the lighter blue, which is Stylecraft brand and not, as far as I know, available in Cyprus. I decided I would stop at that point, since it looked like a good size for a blanket, and since the exact sizes aren't too important. I was quite pleased with the colours:


However, all the edges curled. None of the patterns on the site said that they needed plain knitting at the edges, and the first two had turned out just fine; this pattern didn't seem all that different from the other ones, so I was rather surprised at the edges curling, as can be seen more clearly when I folded it:


I then decided - since I had plenty of the dark blue remaining - to do a double crochet hem all the way around. I'm not good at crochet, and never do anything beyond a line of single or double stitches, but I thought it looked quite effective:


The top and bottom stopped curling as a result, although the sides still had a tendency to curl inwards.

By this stage it was early March. I had bought a 100g ball of yarn when I went to the local shop, in a shade I liked, but rather than embarking on another blanket - since we were due to fly to the UK early in April - I decided to make some 'bonding squares'. These are a wonderful idea: pairs of identical small squares (three or five inches) which are used when a baby must be in special care, or away from his or her mother for any length of time. The baby has one square, the mother sleeps on the other, and every twelve hours or so, they swap. This way, each learns to recognise the scent of the other.

I cast on the number of stitches given in a pattern on the site, noting the recommendation of a plain knitted border, but then used one of the other patterns for the inside. I was quite pleased with the result:


Unfortunately, despite using the smallest recommended knitting needles (4mm) the squares were nearer 6 inches square than 5 inches. I hoped this wouldn't matter!  Next I knitted a pair using the pattern (approximately) as given on the site.. and they, too, were almost six inches square.

By this time we were due to fly soon, so I embarked on the simplest pattern of all, one I knew I could follow without having it printed in front of me, and which I could knit with other people around. Moss stitch (sometimes known as seed stitch) is one of the recommended patterns, and since I had 34 stitches I opted for double moss stitch rather than single (switching style every two stitches and rows rather than every one).

Moss stitch is stretchier than the other patterns... so was slightly more than 6 inches. But by this stage I had, as I thought, three pairs of bonding squares in addition to my three blankets.  As we were due to fly soon, I emailed the admin of the list, asking (a) where to send them on arrival in the UK (and whether I could use a drop-off centre in Epsom) and (b) whether the sizes of the bonding squares was an issue.  I had noted that the site mentioned having plenty of bonding squares, and that blankets were currently more in demand, so I said that I could sew them together to make a 12 x 18 inch blanket if that was more useful.

After various exchanges, I was told that yes, I could drop everything off at the Stitchmouse craft shop in Epsom, but that a blanket would be more useful than 6 inch bonding squares.

However, I could not find a way of arranging the six squares attractively to make a blanket, so decided to knit three more of the moss stitch ones, and then make a 18 x 18 inch blanket using all nine, with the moss stitch ones in the centre and corners. That meant I had to take my knitting needles with me, as well as a wool sewing needle.  

Since I could knit while talking to other people, and these squares were quick and easy, I soon had them completed. Sewing was a bit awkward - I don't enjoy it nearly as much as knitting - and since the moss stitch squares were a tad bigger than the others, it wasn't all that even. But I quite liked the resultant blanket, and don't suppose premature babies mind too much if the edges aren't perfectly even:


We weren't staying near Epsom at first, but in the small town of Alcester, where there's a lovely little wool shop in a side street. So I popped in and bought six 100g balls of Stylecraft yarn, for future projects.

Then I thought I would start one of them. I chose a pale green, and double moss stitch since it's so easy to do while chatting. I even did a small tension square to make sure I had the right number of stitches. I used 4.5mm needles and 90 stitches, and didn't think I'd get all that much done - I only had about a week left in the UK, and wanted to drop the blankets off a day or two after we reached Surrey.

But it was rather compulsive, and I discovered that I could knit in the car, so long as I sat in the back. The blanket grew... and after a marathon knitting session yesterday, I completed it, with about two grams of yarn left at the end!


So yesterday I dropped them off at the Stitchmouse, a lovely friendly little shop. I resisted the temptation to buy yet more yarn while I was there, and also to start another knitting project later in the day!  But my aim is to make around one blanket per month, and drop them off each time we're back in the UK - usually twice per year. 


Monday, October 09, 2017

Lacy Beret

After spending most of the year knitting soft toys for friends and grandchildren, I thought I would try something entirely different. I browsed through my Patons accessories booklet, something I acquired many years ago but, as far as I recall, have never previously used.

I decided to attempt the hat labelled 'lacy beret'.  I'm not one to follow fashion, but this kind of hat seems to be 'in' at the moment, and - more importantly - I rather liked it. The pattern looked complicated, but is only one piece. I felt more confident than I did a year ago, after trying so many different items, so I found some grey yarn - to match, roughly, a grey scarf I have already - and got started.

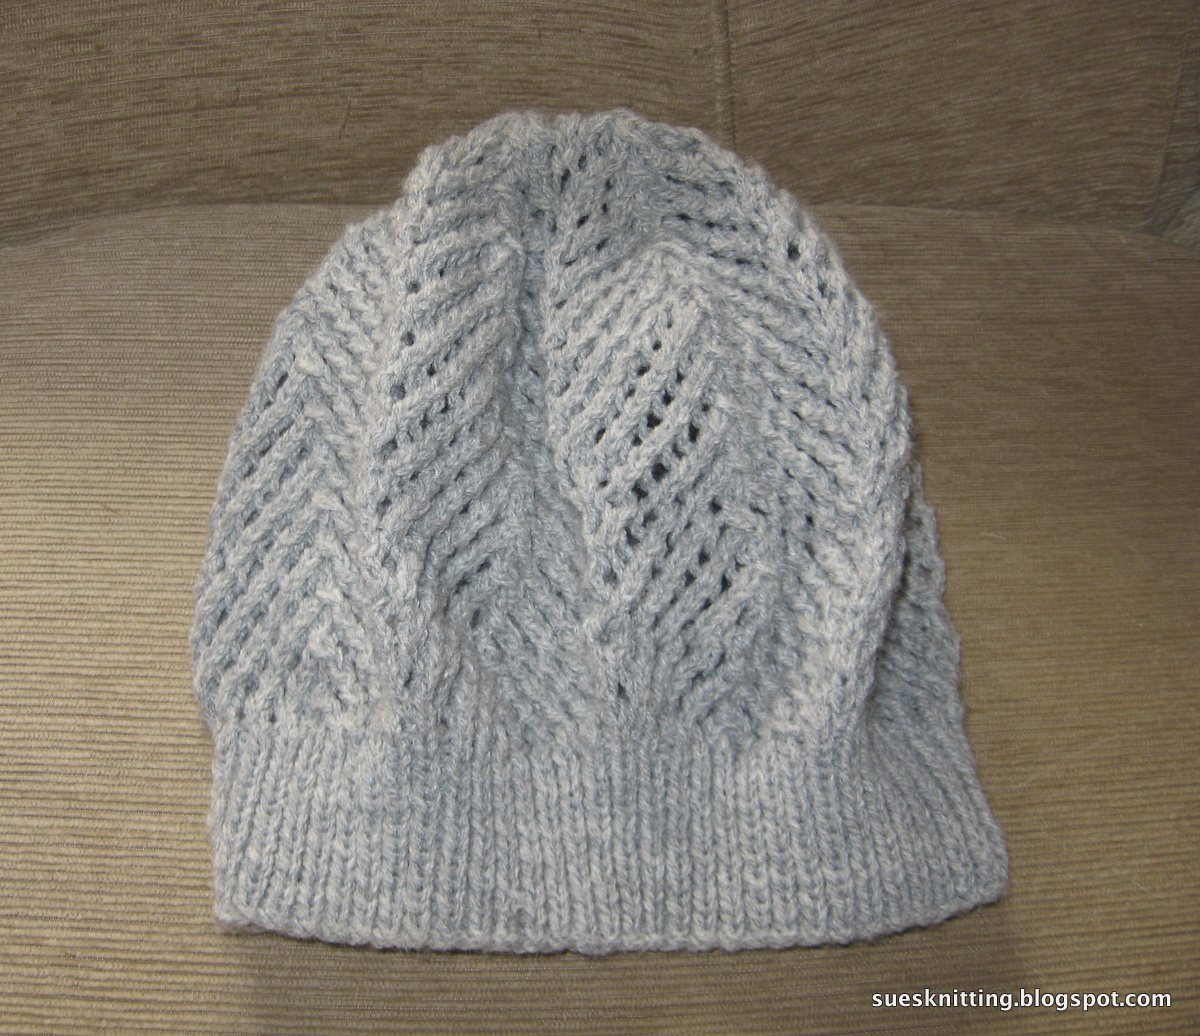
Here's the top view of the finished hat:


The first part is deceptively easy. 3mm needles and fifteen rows of simple rib. Then a switch to 4mm needles, and the lacy pattern part.  I had to learn a new acronym: 'tbl' means 'through back of loops'.  I didn't just have to knit through the back of loops, but knit two together 'tbl', after moving the yarn forward to create an extra stitch. This, combined with knitting two together (in regular fashion) was what created the lacy effect 'holes'.

There were 141 stitches when I started the lacy pattern section, which is the bulk of the hat, and I quickly realised that the 'pattern' instructions were for 20 stitches, meaning that they were repeated seven times, plus an extra stitch at the end.  Alternative rows are straight purl.  And while I usually enjoy 'knit' rows more than 'purl', I found myself looking forward to the purl rows as I didn't have to concentrate or count what I was doing.

I did just four rows per day over the course of a week; each knit row, with its complex instructions, took me about ten minutes.  Knitting through the back of the loops was often rather painful on my finger; I had to remember to purl as loosely as I could, but it was still, sometimes, very difficult to make it work.

I also decided I would count each row of purl, to ensure I hadn't gained or lost a stitch. It would be very easy, for instance, to miss one of the 'yarn forward' instructions, or indeed to do an extra one, as the first and third rows were not the same.  And, sure enough, at least twice I found that I had only 140 stitches.

I then had to try and work out where I'd gone wrong, and put in an extra one on my next row... and that wasn't easy. In fact, the first time I got in such a muddle that I gained an extra stitch and then had to work it into the pattern on my next row.  It's a good thing that I'm not a total perfectionist. I decided that if the pattern went a little awry, it probably wouldn't matter. There was only one time that I actually back-tracked and undid about half a row. I knew instinctively that it would be very difficult, and that I would probably end up losing stitches entirely if I did that.

I'm relieved that it did turn out reasonably well - looking at the top of the hat, as in the photo above, it's not immediately obvious where the pattern is askew. By the time it's on my head I'm pretty sure it won't be noticed at all.

The last twenty or so rows were a little more complicated still, changing each time as the number of stitches decreased to make the top of the hat. I completed all that in just one morning, and then it took less than five minutes to sew it all together.

This is what it looks like when laid flat:


And my problem now is that I don't know how to wear it. The first photo shows it as a beret, but the ribbed section is quite deep.  If I pull it on my head, it looks like a beanie-style hat. If I fold the rib under and push it up, it looks a little like a beret, but rather floppy.

I remember, now, that when I was a teenager, in the junior red cross, I had trouble wearing a beret. It never looked quite right.  So after all that effort, I may find myself just pulling it down over my ears to keep warm in the colder months.

I'm glad I tried out this lacy style - and it's relatively simple, compared to some other patterns I've seen - but think I'll stick to soft toys and more straightforward patterns in future!

Wednesday, September 27, 2017

Knitted Scarecrow

Jean Greenhowe knitted toys book
(Amazon UK link)
My three-year-old grandson watched me knitting soft toys for friends, and paged through my patterns. Then he asked me if I could knit the scarecrow shown on the front of Jean Greenhowe's 'knitted toys' book.

I gulped a little - it's quite a complex and highly detailed pattern - but said I probably could. He's quite keen on scarecrows, and although I did suggest various alternatives, he stuck to his choice. I said I would send it to him for Christmas.

The first part to knit was the trousers, which are done as two pieces in sideways stripes in stocking stitch with the purl facing outwards. They were easy enough. The main body part is knitted with the head as a single piece, and also proved relatively straightforward. Then, keen to see how it looked, I started sewing it together... unfortunately, I was quite tired, and forgot that the trousers were 'inside out', so to speak. So I then had to un-stitch it, by which time I was fed up of sewing. I decided to keep knitting and sew it all together at the end.

None of the rest of the clothes sections were particularly complicated, though at times I wondered how the different sections were going to work out. I tried to follow the given colours as closely as possible, using up yarn I had already. The only change I made was to knit hands rather than mittens, in the same colour as the face.

The hair and fringes seemed complex when I read the instructions. But they were quite straightforward, wrapping loops around fingers before knitting into them. I have learned from experience that if I follow Jean Greenhowe's instructions exactly, they work. I don't have to understand them in advance.

I took a break from the scarecrow to knit the puppy for a friend, then resumed, doing perhaps half an hour per day, collecting the pieces in a ziplock bag.

Eventually I reached the end of the scarecrow part of the knitting. Only the three add-on creatures to do. I put the head, body and trousers to one side, and spread the other pieces on the floor:


At this stage, I rather wished I'd gradually stitched it together, as the instructions suggested!

I had to do the body first, however. Not wishing to un-stitch the head and body parts, it took several attempts (with pins) before I worked out how to attach the trousers, the right way round this time. It was quite a relief to have that done and ready to stuff:


It was then very easy to attach the hat, the nose and the feet, and to make a mouth. It took a couple of hours to get to this stage, and I'd had enough of sewing by then.. but at last it was starting to look like a scarecrow. It even stood up by itself:


A couple of days later, I made the eyes (knotted yarn, not felt pieces that might detach). Then I attached the hair and cut the loops. I managed to work out which of the little pieces were the bow tie and the belt sections, and attached those too.


In my next sewing session, I attached the jacket - done in several pieces garter stitch, so it was quite easy.  My one deviation from the instructions was to have the thumbs facing downwards rather than upwards, which felt more natural.


The coat has tails at the back, with two of the little knitted decorative buttons like this:


It took one more session to complete the basic scarecrow, with fringes at the ankles and wrists (I didn't cut the loops, as they looked fine as they are, and are much less likely to come out). The little flower on the jacket lapel was the last thing for the basic scarecrow.

I was quite pleased with the result, and to my surprise it still stood up, if balanced carefully, at least for a minute or two:


In between sewing sessions, I had knitted the small pieces of animals: a robin for the shoulder, a mouse for the hat, and a ladybird for one of the feet. They were all quick and straightforward. In my final sewing session, I stuffed and sewed them in place. I could no longer get the scarecrow to balance, so here's the completed toy against the corner of a sofa:


Now I have to trust it to the international mail... it's been quite enjoyable, albeit frustrating at time to make this, but it's not something I want to do again. At least, not for a while. 

Tuesday, September 05, 2017

Knitted Puppy

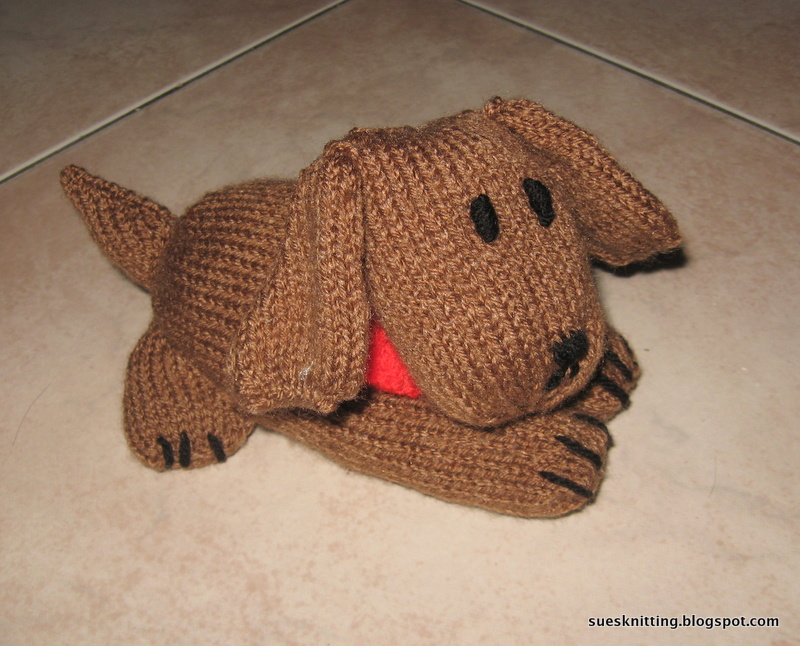
I had knitted toys or ornaments for four siblings, and just one birthday remained. This was for a girl soon to turn nine years old. She paged through all my patterns, before deciding she would like the one labelled, simply, 'puppy' in the Jean Greenhowe Knitted Animals book.

I didn't have any yarn of the colour shown in the book, and couldn't find any at the local shops. Eventually I found quite a nice tan/brown, and my friend said that would be fine.

I didn't start knitting it until a couple of weeks before her birthday. The body and front legs are all once piece; a bit fiddly, but not too time-consuming. The head wasn't then too difficult, either. My heart always sinks when I see instructions that begin, 'increase in every stitch' right after casting on. I knit quite tightly, and never like increasing in every stitch. However, there weren't too many stitches, and it wasn't too painful.

When I got to the collar piece (in red) I was mystified by the instructions. But I trust Jean Greenhowe, so kept knitting.. and then, when sewing it together, realised that it's not just a collar but a whole piece of neck, so to speak, all red. It would have been clearer if the top and bottom parts were brown, I think.

I didn't see how it was going to go together until finally, a day before the birthday, I stuffed and sewed the whole thing up. It took nearly two hours to complete it; I don't like this stage at all, so usually leave it to the end. Just two double lengths of yarn were supposed to hold the head and collar in place, leaving the head free to move. The pattern did say to sew it fully if given to a young child, but my friend isn't going to try and eat it.. however I did put some more stitches in, to make it more secure.

The result was, I think, quite pleasing:


There were accessories given too, a bowl and a bone. Embroidering 'DOG' seemed a bit pointless but I hadn't discussed this with my friend, so I thought I'd better follow the picture. I didn't put any cardboard in the base of the bowl; I thought it would make it more child-friendly as it would be washable, but it meant it wasn't so solid despite two layers of knitting. The bone was very quick and easy to make.


Tuesday, July 18, 2017

Hush-a-bye doll, with variations

I finished the Jean Greenhowe 'Hush-a-bye' knitted doll a few months ago, intended for my granddaughter's first birthday.  One of my young friends kept looking at it, and when I offered to knit something for her birthday, she asked if I could make a few adjustments.  She wanted a doll in white underwear which she could dress, and which she could make more garments for, rather than one with a fixed outfit.

 I said I was willing to try, so she helpfully wrote me a list of what she wanted:

  • Detachable skirt
  • No collar or belt
  • Sleeves in the same colour as the skin
  • Chest in white
  • Skirt in beige
  • Bonnet in blue
  • Shoes in brown

I sewed a bit of machine style elastic into the skirt so that it doesn't fall off, and when I made the arms, I simply kept knitting, missing out the sleeve cuffs, so that the hands were part of the same piece of knitting as the arms, rather than separate.

I was a bit concerned that it wasn't going to look particularly attractive, but once I'd made the face, and put the bonnet on, I think it's rather sweet. It's a little odd having the vest showing, but I'm sure my young friend will make a variety of tops.